| Reloading Basics, from: Ultimate Reloader | |||||||||||||||||||||||||||||||||||||||||||||||||||||||||||||||||||||||||||||||
|
Equipment, where do I start?
Once a shooter decides they want to reload their own ammunition, one of the important questions they will need to ponder is what type of reloading press they should buy to get started reloading with. There are single stage presses, turret presses, and progressive presses to choose from. There are presses that manually index, presses that auto-index, and presses that don’t index at all. A shooter will typically ponder: “Should I start out simple, or go straight for a more elaborate setup?”. In the “Info Center” here on Ultimate Reloader (home page, left bar), you will find a few articles that collectively answer most of the considerations for this question: To summarize what these articles talk about, I’ll start by outlining the tree different types of presses: | |||||||||||||||||||||||||||||||||||||||||||||||||||||||||||||||||||||||||||||||
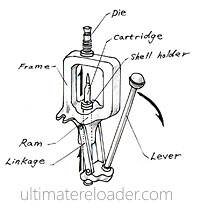
| The Single Stage Press
A single stage press holds one die, and has a shellholder that holds one shell casing. This press is the simplest type, but is the most time consuming to use typically. | ||||||||||||||||||||||||||||||||||||||||||||||||||||||||||||||||||||||||||||||

| The Turret Reloading Press
A turret reloading press is much like a single stage press, with the exception that on the top of the press, there exists a revolving turret that allows multiple dies to be installed on a press at the same time. Dies can be “indexed” into position (either manually or automatically). The turret press can be quicker to use than a single stage due to the die indexing feature, but is in most ways similar to a single stage. | ||||||||||||||||||||||||||||||||||||||||||||||||||||||||||||||||||||||||||||||
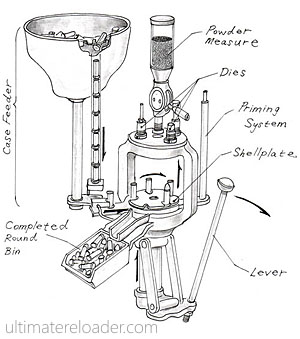
| The Progressive Reloading Press
The progressive reloading press is more complex than single stage and turret presses, but offers a much higher throughput rate. These presses take longer to setup, and are more prone to misfeeds, jams, and other stoppages. Progressive reloading presses also require more expensive parts in order to add new cartridges to your reloading portfolio. | ||||||||||||||||||||||||||||||||||||||||||||||||||||||||||||||||||||||||||||||
| So you may be thinking: Just tell me what to buy! Well, it’s not quite that simple as most purchasing decisions are not. (Too bad.) Depending on what you plan to load for, your mechanical aptitude, and other factors, there’s a “right type of press” for you. Here, I’ll focus on “progressive versus non-progressive” as those are the two major categories for types of reloading presses.
Take the survey:
I do want to underscore one point here: Reloading pistol ammunition on a single stage (and even a turret) takes a lot of time! That’s why I do suggest that first time reloaders start with a progressive if they can take their time, work single rounds at a time (to get started), and they have mechanical abilities. This does not fit everyone, but can certainly be a good way to get started. On the contrary, if you are slow and methodical, starting with a non-progressive could be the right thing for you even if you are loading pistol. There’s certainly more to it than that, but this gives you some factors to think about. If you do decide to start with a progressive, it would be valuable to have an experienced friend help you get things going. Another idea for first time press owners that have decided to start with a progressive would be to use a friend’s single stage to learn how to load a box of ammo. If you do the “one-box single stage” route, you’ll learn a lot from that experience, and have an easier time getting your progressive up and going. You will also want to watch videos (like the ones on this website) regardless of what type of press you decide to buy. The best way to get going is to do just that (go for it)! Once you gain momentum and learn the ropes, you’ll have a lot of fun reloading ammunition. Just remember to be safe!
|
| 
An assortment of bullets, from left: Plated FP, Lead SWC, Lead RN, JSP, JHP, Jacketed RN
| Understanding how bullets are constructed for each handgun shooting application is important background information for proper bullet selection, and to understand how the reloading process works.
| 
Construction
| There are three basic types of bullet construction commonly used in handguns:
| Application
| There are two classifications for handgun bullets:
| 
Diagram: Automatic Pistol Bullet (Flat Point shown)
| Automatic pistol bullets
| 
Diagram: Revolver Bullets
| Revolver Bullets
|
| Types of Bullets
| There are many different types of bullets that each have a unique set of characteristics, and an intended use for each as well. Here, I’ll describe different types of bullets based on their fundamental shape and properties. Since acronyms are typically used to describe bullets (Such as RNFP for Round Nose Flat Point) I’ll cover the most commonly types of bullets, and leave it to the reader to understand other permutations of these terms.
| 
Wadcutter (WC)
| The wadcutter is perhaps the most basic bullet profile. Typically made from lead, these bullets are basically a cylinder of lead. These bullets produce clean “punches” in paper targets.
| 
Semi-Wadcutter (SWC)
| The semi-wadcutter is a variation on the wadcutter. This bullet has a cylindrical body with a shoulder, and a flat point on the tip. These rounds offer better ballistic performance (less drag) than wadcutters, still punch nice holes in paper targets, and can be fed by automatic pistols in most cases.
| 
Flat Point (FP)
| Flat point bullets generally have a flat point on the tip, and a straight taper from the body to the tip. These bullets feed well in automatics, and punch a small hole in targets (the diameter of the flat point).
| 
Round Nose (RN)
| Round nose bullets have a cylindrical body with a round tip. These bullets offer the best feeding characteristics for automatic pistols (Think ball 45acp ammo from WWI+, and 9mm parabellum) and good ballistic characteristics as well. These bullets do not punch clean holes in targets, and are not good for hunting and defense.
| 
Round Nose Flat Point (RNFP)
| This bullet is a cross between the Flat Point (FP) and the Round Nose (RN) bullet with characteristics similar to the Flat Point (FP) bullet.
| 
Soft Point (SP)
| Jacketed Soft Point (SP) bullets are a jacketed bullet with an exposed lead tip. These bullets offer the benefits of fully jacketed bullets, but with increased stopping power due to the enhanced expansion becuase of the soft tip.
| 
Hollow Point (HP)
| These bullets feature a hole in the tip which greatly enhances expansion and corresponding stopping power.
| 
Bevel Base and Plain Base Bullets
| Another important characteristic of bullet shape is the base profile. Jacketed and plated bullets typically have a plane (flat) base. Lead bullets can employ a plain base (for increased accuracy) or a bevel base (to minimize lead shaving while seating, and to enhance bullet placement).
| There you have it! The basics of handgun bullets. There’s much more to know, but this is enough to get one started in the reloading process. We’ll cover some of these topics in more detail in specific articles about reloading, bullet product reviews, etc.
| |
| 
Pistol Cartridge Basics
| Before we get into the process of pistol cartridge reloading, it’s important to make sure we understand the individual components that make up a completed cartridge. Automatic pistol and revolver cartridges are made up of the same basic components, but have some important differences we’ll discuss here. Cartridge components: Shell casing
Bullet
Powder Charge
Primer
|
| Pistol Cartridge Types:
| There are two fundamental types of pistol cartridges in widespread use today: automatic pistol, and revolver. There are really two main differences, the base of the cartridge, and the means by which the bullet is held in place.
| 
Diagram: Automatic pistol cartridge overview:
| Automatic pistol cartridges:
| 
Diagram: Revolver cartridge overview:
| Revolver cartridges:
|
| 
Pistol Reloading Basics
| In this article, I will describe in simple terms the different stages that take place in the reloading process for pistol cartridges. Each stage corresponds to the common sequence and combination of events that occur for most turret or progressive style reloading presses with a common die setup. Note that order of these events, and even the combination of dies may vary from one process or piece of equipment to another. Reading this article will allow you to understand how this process works.
| 
Diagram: Simplified view of sizing and depriming die in action
| Stage 1: Sizing and Depriming
| 
Diagram: Seating a new primer
| Stage 2: Priming
| 
Diagram: Simplified view of expanding
| Stage 3: Expanding
| 
Diagram: Charging the case
| Stage 4: Powder Charge
| 
Diagram: Seating and crimping
| Stage 5: Seating the bullet, crimping the case
| 
Diagram: Completed Round
| The completed round is properly sized, has a new primer, a charge of powder, and a properly seated bullet. The case has also been crimped so that the bullet is properly retained, and so that rounds chamber properly. |
|
Pistol Powders
|
| 
Gunpowder Basics
| Proper selection of gunpowder is important for any realoading application. The various characteristics of the powder will influence the ballistics of the completed round, the consistency of metering, and many other things. In order to select a powder for your application, it’s important to understand the various characteristics that different powders exibit. Powder Parameters
Burn rate
Density
Granule shape
| 
Ball powder
| This type of powder consists of spherical granules that are typically small in size. This type of powder usually meters well.
| 
Flattened ball powder
| This powder is very similar to ball powder but is flattened slightly. This type of powder behaves almost identically to ball powder.
| 
Flake Powder
| This powder has granules that are shaped liky tiny disks. Flake powder can be more difficult to meter correctly due to the fact that it can “stack up” in the powder measure, and can be less uniform in density when metering.
| 
Stick Powder
| This type of powder is most frequently used in rifle applications. Stick powder has granules that are shaped like small extruded cylinders. One issue that can arise with stick powders is the powder measuring cutting the sticks.
| 
Some common powders, from left: Winchester W-231 (flattened ball), Winchester W-296 (ball), Alliant Blue Dot (flake), Alliant Unique (flake)
| | |||||||